Account security and passkeys
Set up passkeys, password and provider sign-in, configure two-step verification, save recovery codes, and manage sessions.
passkey · WebAuthn · FIDO2 · Windows Hello · Face ID · Touch ID · MFA · two-factor authentication · sessions
Open Settings → Personal security to manage your personal account. Your methods follow your account across companies.
Personal settings groups Personal security, Account and preferences, and Notifications together. Personal security lists connected providers, Passkeys, two-step verification and recovery, password sign-in, then active sessions. Company authentication, SSO and network rules remain in company settings. Actions are aligned at the right of each section or method. Each method group has its own container, matching Appearance. In passkey dialogs, confirmation controls and the red Cancel action share the footer; they wrap on smaller screens.
Each method heading shows Active with a blue check or Inactive in gray.
For login instructions and lost-device scenarios, use Sign in and recover access.
Screenshots use a fictional Lumen Atelier Studio demo profile. The displayed QR setup key and DEMO recovery
codes are examples that do not provide account access. Select a screenshot to open it at full size in a new tab.
Browser and operating-system passkey dialogs vary; the captures below show Azimea’s own screens.
Emails about your account
Section titled “Emails about your account”Account emails identify AZIMEA LABS S.R.L. in their footer, with its Romanian company registration, CUI, registered office, support address and links to the privacy policy and terms. Footer labels and legal links follow the email language. Optional notifications also include their relevant communication preferences in the message.
Before you change security settings
Section titled “Before you change security settings”Keep at least one working sign-in method and access to your verified account email. Before removing a method, test its replacement in a separate browser session. Your company may require stronger authentication than your personal preferences; check Company requirements if an action is refused.
Security dialogs confirm your existing identity before applying a change. If you have a passkey, select Confirm with passkey and complete its device prompt. Use another method switches to password and your configured app/email code or recovery code. Accounts without a password can use a passkey, or verified-email proof when no authenticator is configured. In email proof, select Send email code first; the code field and Continue appear after a successful request. This confirms a change; it does not turn on email-based 2FA.
Signing in
Section titled “Signing in”- Enter your email address and select Continue.
- Choose Sign in with passkey, a configured Google/Microsoft provider, or Continue with password.
- If password or provider sign-in requires your configured second step, enter its code. Email verification sends one code when that step opens; resending has a cooldown. Use a recovery code uses an unused recovery code instead.
On a browser used previously, Azimea can suggest your last successful method for that email. This preference is kept in that browser for up to 30 days and never grants access. A new browser shows neutral choices rather than revealing whether an email has an account or which private methods it has configured. Provider buttons appear only when that provider is configured for the application. Company SSO appears on an eligible company’s sign-in page.
Change returns to the email step. Use another method opens the alternatives while retaining your email and requested destination. A passkey or personal provider must belong to the Azimea account identified by the entered email. An already linked provider can use a different email address. If you choose a provider belonging to another Azimea account, retry with the correct account. An external identity is never silently linked to an existing account, including Google identities with verified addresses. Passkey prompts open after your action; Azimea does not assume that a registered key exists on the current device.
After signing in without a passkey or two-step verification, Protect your account offers passkey or authenticator setup. Remind me in 30 days postpones this optional invitation in the current browser. The invitation waits until onboarding, invitations and cookie choices have finished. Mandatory company requirements cannot be postponed.
Passkeys
Section titled “Passkeys”Select the blue Add passkey button with the fingerprint icon:

- Confirm your identity. If you already have a passkey, Confirm with passkey is offered first. Select Use another method to use your existing password and any configured verification code. The code field names its source: email or your authenticator app. For email verification, select Send email code first; the code field appears after the request succeeds.
- Follow your browser’s prompt to create the key on your device or in your passkey provider.
- Enter a recognizable name, such as Personal phone, then select Save passkey to register it with Azimea.
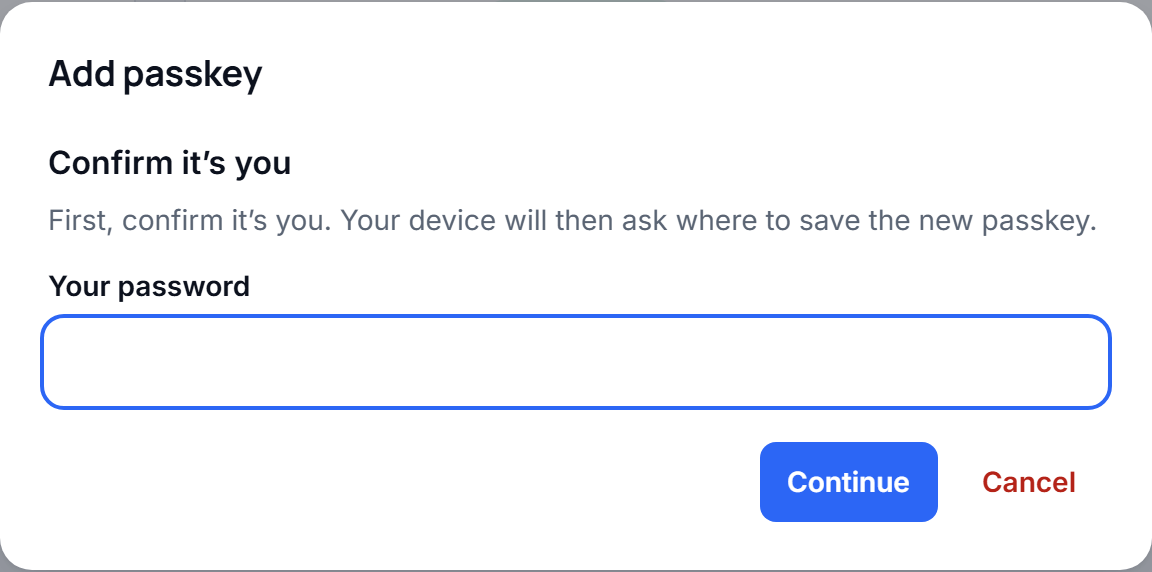
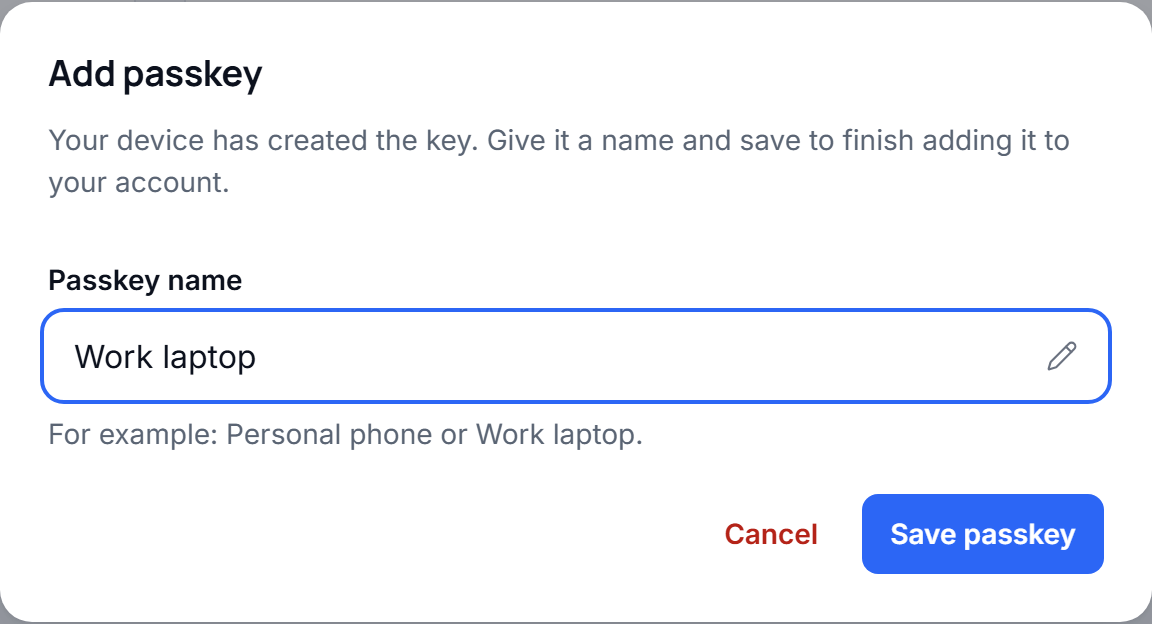
The browser can use Windows Hello, Face ID, Touch ID, a device PIN, a compatible password manager or a hardware security key. Azimea stores the public credential; your device or passkey provider manages the private key. Your fingerprint, face image and device PIN do not reach Azimea.
You can register up to ten passkeys, with names up to 64 characters. Add passkey is hidden when this limit is reached. Rename or remove keys from this section; Remove passkey appears in red. Save an additional key on another device or in another password manager. A device that already holds an excluded credential can refuse duplicate enrollment after identity confirmation has succeeded; the dialog explains this without calling it a cancelled confirmation. The existing passkey stays registered and usable. Removing a passkey prevents future sign-ins with it. Review active sessions separately after losing a device. Azimea refuses to remove your last remaining sign-in method. A modern browser and HTTPS are required. Cancelling a device prompt leaves your account unchanged; retry or use another method. Cancelling the naming step does not register the key with Azimea, although your device may already have saved it. A failed save keeps the name for retry; Start again returns to identity confirmation if the registration challenge has expired or cannot be reused. Passkeys are bound to the configured Azimea dashboard domain. Use that dashboard address when signing in with a passkey; a different company or agency domain does not automatically share its credentials.
If confirmation does not complete, use the device or password manager where the existing passkey was saved. A key listed in Settings records its registration; it does not mean that the current device has its private key. Choose Use another method if that device is unavailable. Browser refusals can represent cancellation, timeout or an unavailable credential; Azimea does not infer which occurred. Address-related errors ask you to return to your usual dashboard address. Retrying a device confirmation starts a fresh request; naming follows only after creation succeeds.
After entering your email, choose Sign in with passkey, marked with a fingerprint symbol. Local device verification completes the sign-in without an additional emailed or authenticator code. Password and external-provider sign-ins still require your configured second step. The button describes device verification and shows Confirm on your device… while waiting for the browser’s confirmation. After cancellation or failure, retry on the same screen or choose another method; your email stays entered.
If Windows Security asks you to insert or tap a security key, it is requesting a hardware key, rather than your Windows Hello PIN. Use the device or passkey provider where you enrolled the key. To use Windows Hello, complete registration on your own device; the operating system controls its PIN/biometric dialog. Azimea never asks you to type that PIN into a web form.
Password and passkey attempts share an authentication request limit. If it is reached, wait before retrying; switching methods does not reset the limit. The page explains that there were too many requests rather than reporting an internal error. When the server supplies a retry time, the page displays a countdown and waits before allowing another password or passkey attempt. Other unexpected errors retain a correlation code for support.
Choose where to save your passkey
Section titled “Choose where to save your passkey”The choice appears in the browser or operating-system dialog, after Azimea confirms your identity and starts creation. Azimea does not provide its own list of password managers. Options and wording vary by browser, operating system, installed providers and company restrictions.
| Save location | What to expect |
|---|---|
| Google Password Manager | Chrome can store the passkey with your Google account. It may ask for a Google Password Manager PIN or device verification. Other browsers do not automatically gain access to that store. |
| Windows Hello / this Windows device | The credential is stored on this PC and unlocked through Windows Hello. It can be available to compatible browsers on that PC; do not assume it is backed up or available on another PC. |
| Apple Passwords / iCloud Keychain | Availability and synchronization depend on the Apple account, device and browser integration. |
| Another password manager | Choose an offered provider and follow its prompts. Cross-browser use depends on that provider’s integration. |
| Hardware security key | Insert, tap or unlock the compatible key as requested. You need access to that physical key later. |
| Another phone or tablet | If offered, follow the browser’s cross-device instructions. The credential stays with the selected device/provider. |
If Chrome proposes Google Password Manager and you want Windows Hello, look for an alternative save location in that dialog. It may be labelled Save another way, Other options or similar. Select Windows Hello or This Windows device only if offered. If it is absent, cancel and check your platform/provider configuration; do not assume that creating a Google Password Manager PIN registers a Windows Hello credential.
To add a second store, keep your working key, select Add passkey, create the new credential in the other store, and save it with a distinct name such as Windows Hello - work PC. Test sign-in from the intended browser before removing anything. Renaming an Azimea entry does not move its credential to another device or password manager.
For platform-specific screens, see Google’s Chrome passkey guide and Mozilla’s Web Authentication support.
Rename or remove a passkey
Section titled “Rename or remove a passkey”- Find the key by its name in Passkeys.
- Select Rename passkey to change its display name, or the red Remove passkey to revoke it in Azimea.
- For a rename, enter the new name. For removal, check that the dialog names the intended key.
- Complete the existing-account confirmation. The list updates after success; Cancel closes without applying the change.
Removing a key from Azimea does not delete the copy held by its password manager or device. Deleting a credential only from a device can leave its registration listed in Azimea. Manage both sides where appropriate, and review active sessions separately: removing a passkey is not the same action as signing out a browser.
Passwords, verification codes and recovery
Section titled “Passwords, verification codes and recovery”Set up an authenticator app
Section titled “Set up an authenticator app”- In Settings → Security, find Two-step verification → Authenticator app and select Set up.
- Confirm your identity using an existing method.
- Open your authenticator app, add an account and scan the displayed QR code. If scanning is unavailable, use the manual setup key with time-based codes. On a phone, use Open authenticator if supported, or add the key manually.
- Enter the current six-digit code from the app and select Turn on. Setup is not complete until the code is accepted.
- Save the recovery codes as described below. Keep the QR code and manual setup key private.
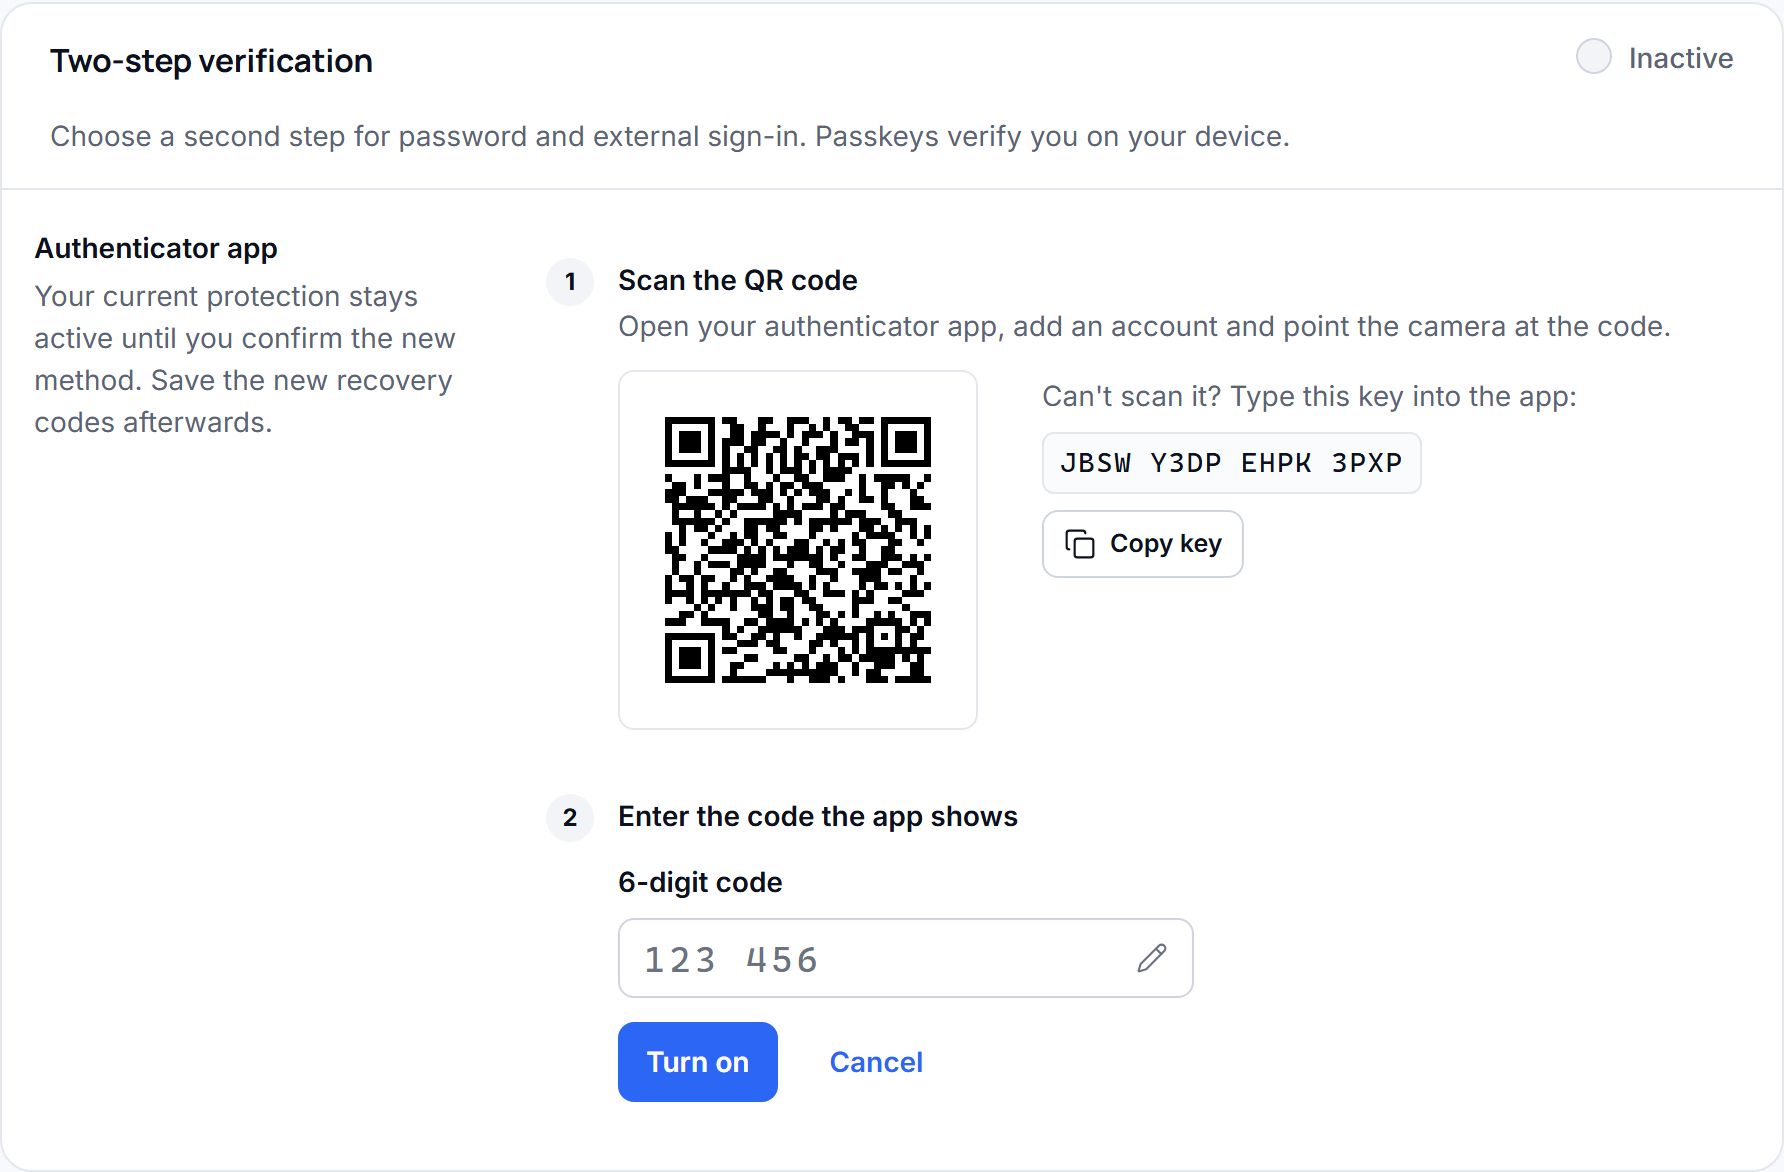
Set up email verification
Section titled “Set up email verification”- In Two-step verification, select Use email instead.
- Confirm your identity with an existing account method. If replacing an authenticator, use its current code or an unused recovery code when requested; the new email code does not replace that existing proof.
- Open the setup message sent to your verified Azimea email address.
- Enter its six-digit code and select Turn on. If needed, request another code after the resend cooldown.
- Save the new recovery codes and confirm that you have stored them safely.
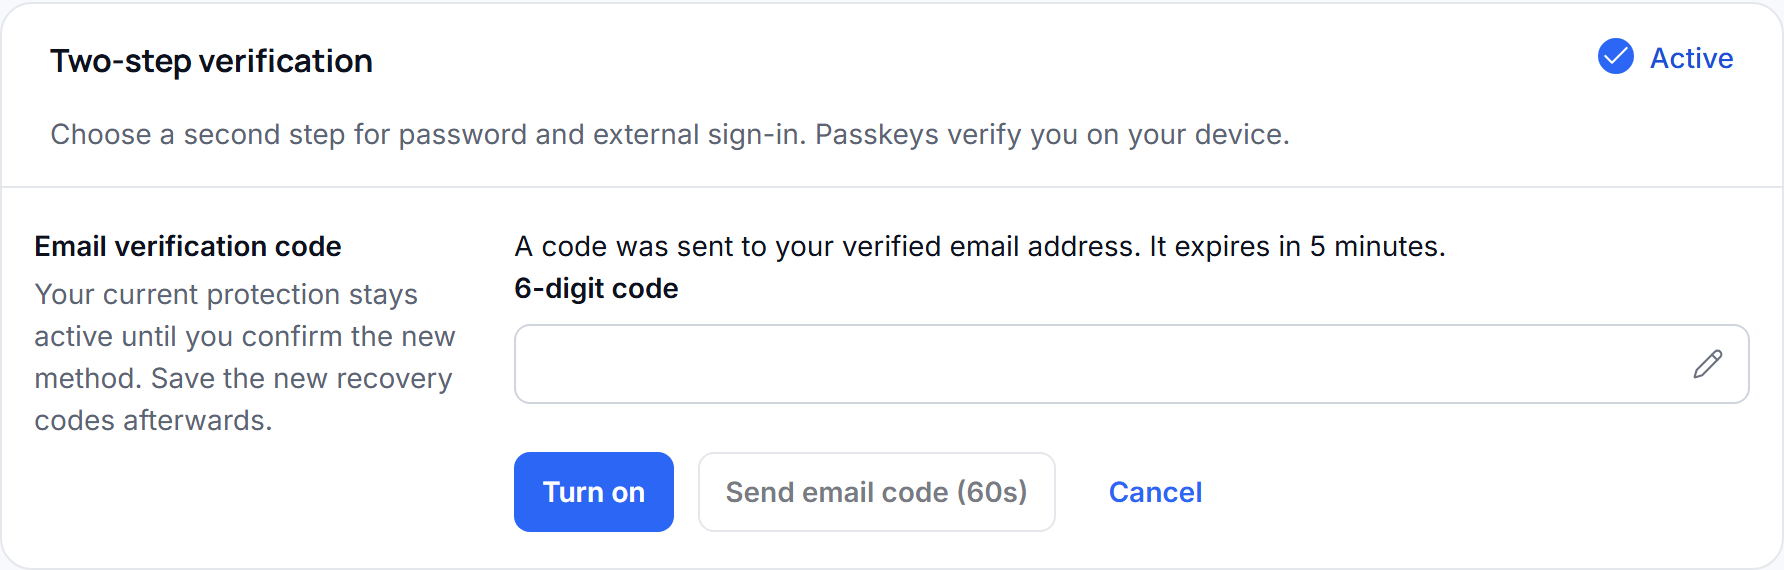
Switch or turn off code-based verification
Section titled “Switch or turn off code-based verification”To switch from email to an app, select Use Authenticator instead and complete app setup. To switch in the other direction, select Use email instead and complete email setup. Cancelling or failing to confirm the replacement leaves your current method active. This version supports one active code method at a time.
To disable it, select Turn off in Two-step verification and confirm your identity. This changes the code requirement for password and external-provider sign-in; it does not remove passkeys. A company requirement can prevent disabling protection. Adding or removing a passkey does not itself enable or disable this code method.
Save and replace recovery codes
Section titled “Save and replace recovery codes”- When a recovery set appears, select Copy or Download and store it somewhere private that remains available if you lose your authenticator device or mailbox access.
- Select I have saved these codes somewhere safe, then Done. The full set is shown only at creation.
- Later, check Recovery codes for the number of unused codes. To replace the set, select New codes, confirm your identity, and save the replacement before leaving.
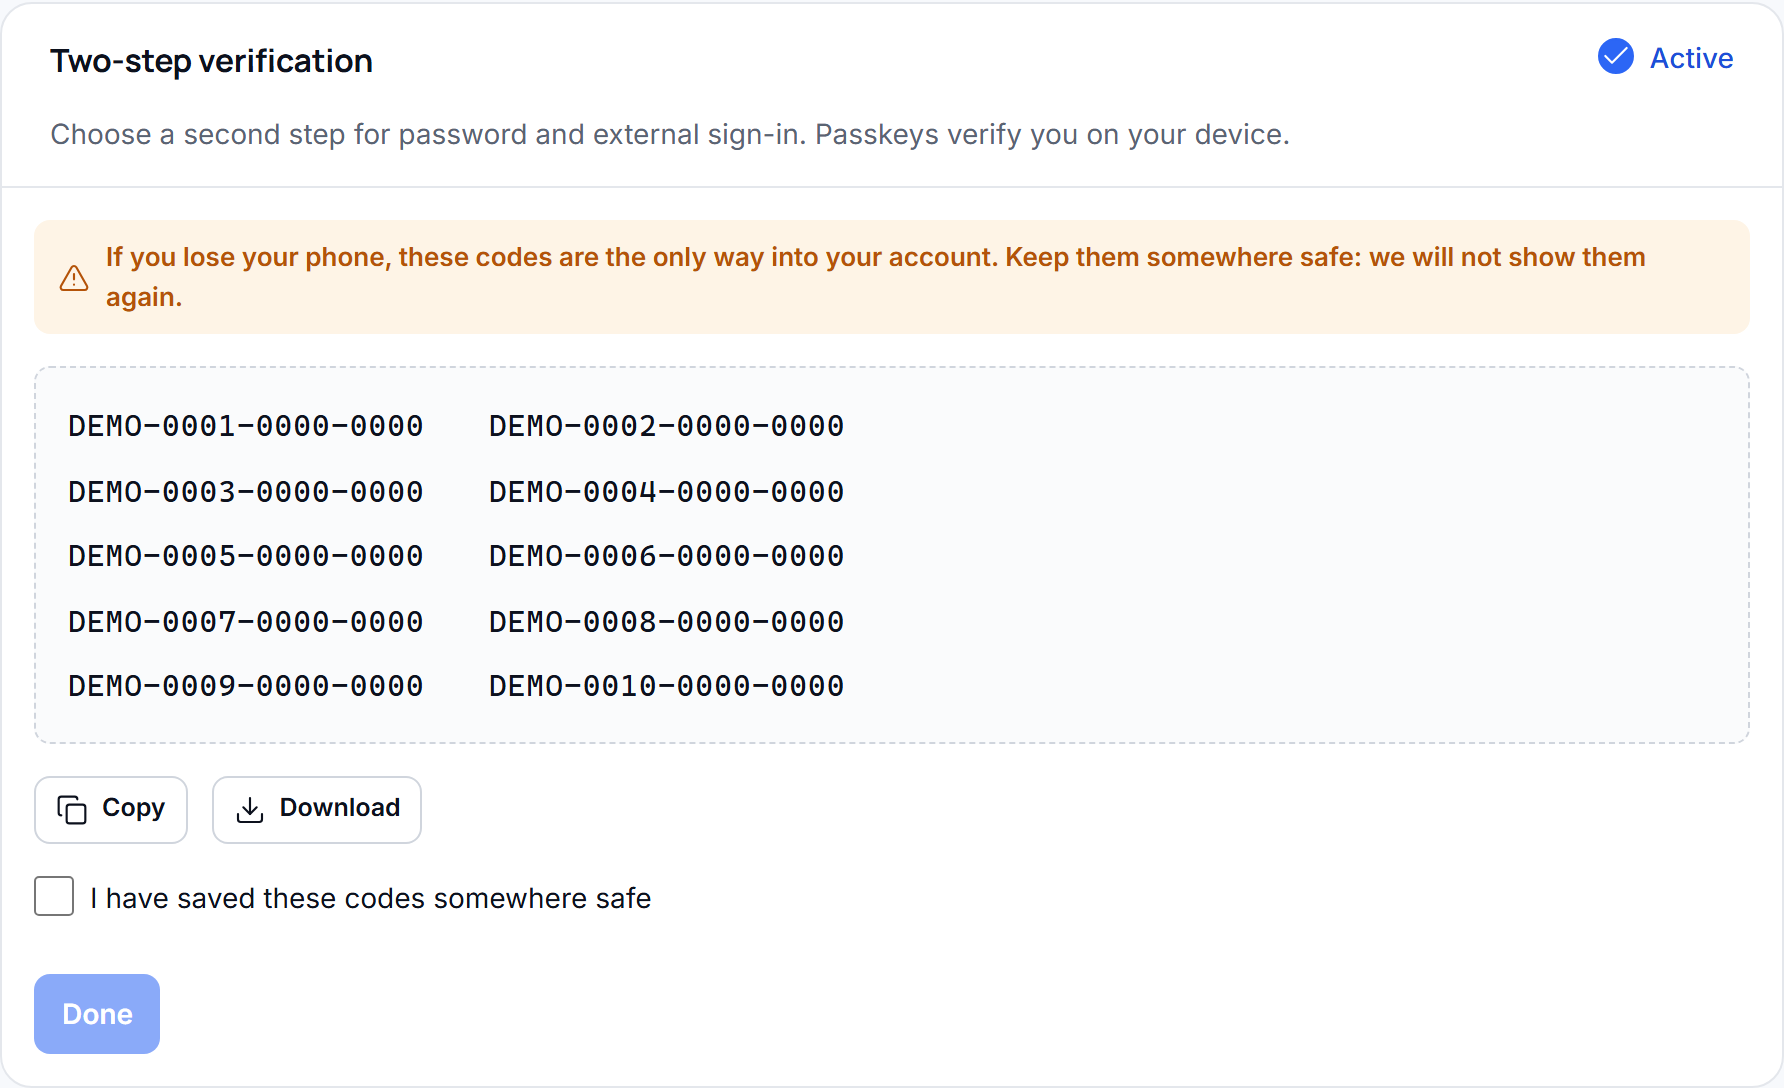
Each code works once in place of an app or email code at the second sign-in step. Replacing a set invalidates every code from the old set. See Recovery-code sign-in when your normal second step is unavailable. Never send your recovery codes to support.
A recovery code accompanies your primary sign-in method; it is not a standalone passwordless sign-in option. An email code is also a second step, not an independent login method. Losing an authenticator does not automatically enable email as a fallback. If you lose all usable methods or recovery codes, contact support for account recovery.
Add, change or disable your password
Section titled “Add, change or disable your password”- In Password sign-in, select Add password or Change password, according to the current state.
- Enter a new password that meets the form’s requirements: at least eight characters, including an uppercase letter, a lowercase letter and a digit. Choose a unique password; special characters are supported.
- Confirm your identity through the dialog’s existing-account confirmation and wait for success.
To remove password sign-in, first add and test a passkey or connect a provider. Select Disable password sign-in and confirm your identity. The last remaining primary method cannot be removed, and operator accounts retain their password requirement. If you later need a password again, use Add password or the password-reset flow. Existing two-step verification remains active. Password dialogs use the same footer as passkey management: choose the proof method, confirm, or select the red Cancel action.
Connect Google or Microsoft
Section titled “Connect Google or Microsoft”- In the connected-account section of Security, select Connect beside the available provider.
- Complete the provider’s sign-in screen with the identity you want to use.
- Back in Azimea, a confirmation dialog opens automatically. Check the provider and email address, then confirm using an existing Azimea account method. Signing in at Google or Microsoft alone does not finish linking.
- Check that the provider is marked Connected. Test it from a separate sign-in session.
Choose Cancel or press Escape to close the dialog without linking the account. If confirmation fails, the dialog stays open with the error so you can correct your credentials and try again.
The provider must be available in Azimea. Linking is explicit: matching email addresses do not automatically join accounts. To disconnect a linked identity, select Disconnect and confirm your identity. Keep another primary method available. Disconnecting a provider changes account security and ends other browser sessions.
Confirm sensitive changes
Section titled “Confirm sensitive changes”Security changes require an existing passkey, or your current password and configured verification code. Accounts without a password can use a passkey, or a verified-email code when no authenticator is configured. Passkey confirmations expire after five minutes and authorize one change in the same browser session. Passkey and password-method changes generate mandatory account-security email notifications. Provider linking and removal also generate these notifications.
Linking a personal external provider or a company SSO identity also asks for an existing account method before the new identity is attached. Normal VPN/network-policy changes require the same confirmation. The separate network recovery flow keeps its own restricted verification and does not grant general account access.
Active sessions
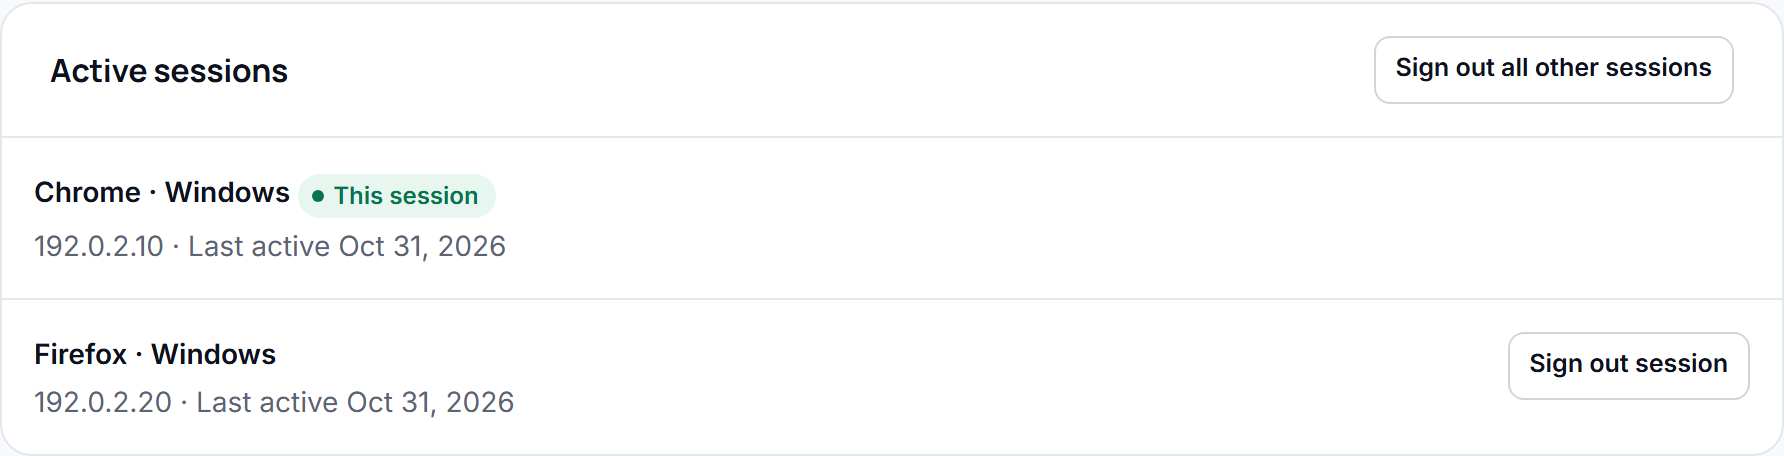
Section titled “Active sessions”Active sessions lists browsers, source IP addresses and last activity. A VPN or corporate gateway may determine the IP address. Browser descriptions are informational and do not prove a device’s identity.
The current session appears first, followed by other sessions in order of recent activity. Lists longer than eight sessions have page controls so older sessions remain available without a long page.
Choose Sign out session for another browser, or Sign out all other sessions to keep only your current session. Confirm your identity first. The revoked cookie is refused on its next authenticated request; protected realtime delivery also checks the session. Tabs sharing one cookie share one browser session. Starting a new company session replaces the previous session record.
Company requirements
Section titled “Company requirements”Open Settings → Company security → Sign-in requirements. Direct Owners and Admins can require two-step verification (MFA) for all members, or require passkey sign-in for owners and administrators. The administrator must already have signed in using a compliant method before enabling the requirement. Personal preferences cannot bypass it.
Members who do not meet a requirement see an access screen before company data opens. Configure security opens personal settings; Verify to continue confirms a configured factor and upgrades the current session without a full sign-out. Creating a method alone does not upgrade the session: confirm it afterward. A code cannot satisfy a company requirement for a passkey. People with other company memberships can choose another company from the access screen. Contact your organization if you cannot meet its requirements. These policies protect human company sessions; integration credentials retain their own controls. Existing agency two-step requirements remain independent.
Company SSO and company network access continue to apply separately.
Check your setup end to end
Section titled “Check your setup end to end”- Keep your original signed-in session open while testing from another browser or private window.
- Enter your email. Check that Use another method exposes the alternatives when a previous method is suggested.
- Test password sign-in. If code-based verification is active, complete the configured code or one recovery code.
- Test each passkey on the browser/device/provider where you expect to use it. Under the current flow, successful passkey verification does not request an additional app or email code.
- Test connected providers and company SSO if you use them. Complete any required second step and company checks.
- Review Active sessions. Sign out your test session when finished. Keep your recovery set private and available.
If a step fails, keep your working session and method. Follow Sign-in troubleshooting before removing or replacing credentials.